Laying pavers can be very simple. At it’s very core, you can lay them on the ground and that’s it. However, those perfectly lined up and levelled pavers we see in Instagram/Pinterest may need some tinkering. Depending on the paver size and the area you’ll be working on, this “tinkering” could easily escalate. And I mean, it could lead to injuries. Yes, I personally know someone who blew his knee and had to go through surgery. So, safety first – be mindful of your back, knees and everything else at all costs!
Not trying to scare anyone, I love pavers. In fact, this isn’t my first rodeo, I’ve had two paver projects before using paving sand and mortar. Unless you have a perfectly flat ground/surface, you’ll need either of these two as base – mortar or paving sand. There may be other ways of doing this but I can only share what I have done, and hopefully this gives you some lightbulb moments along the way.
Here we go.
The Problem
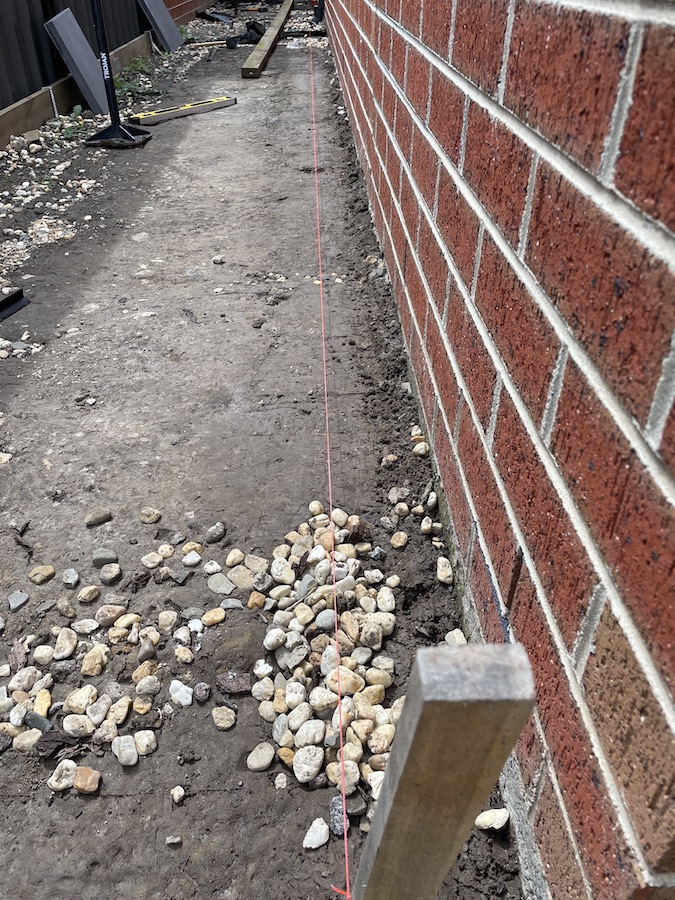
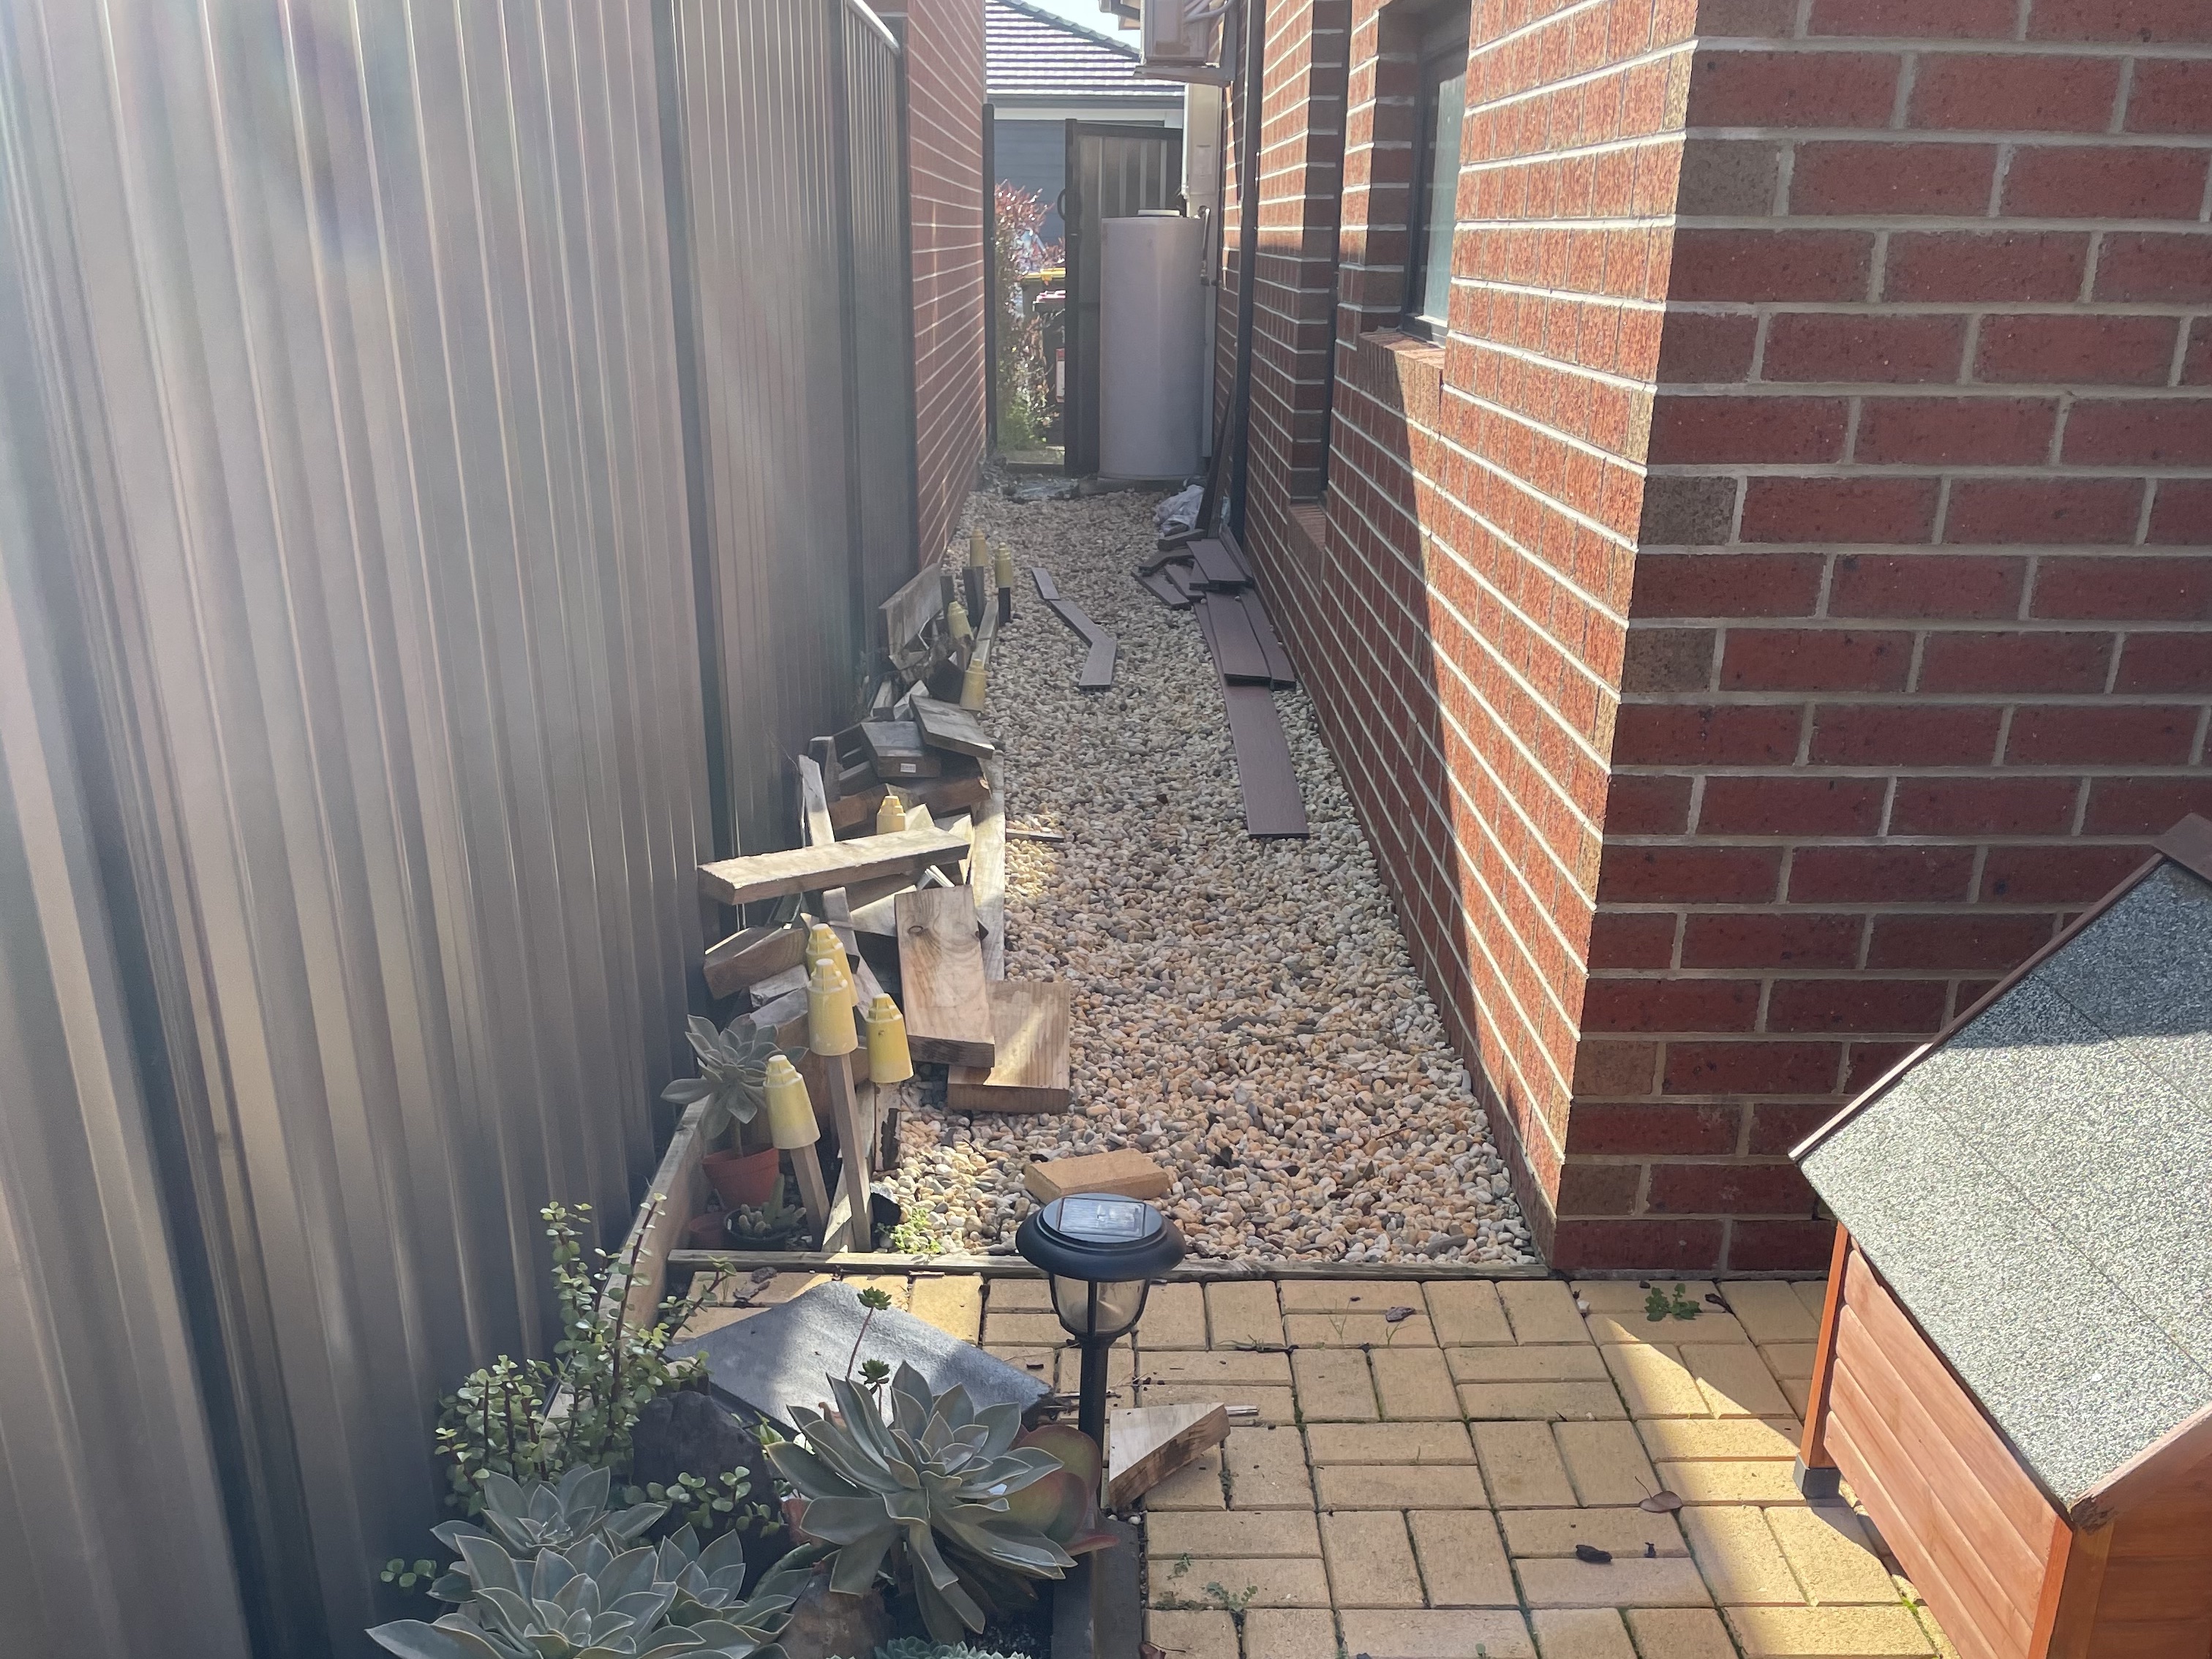
Our pathway leading to the sidegate has become my dumping ground for timber, garden rocks and pretty much every scrap material from my DIYs. We all have this, maybe-I’ll-need -this-one-day habit (or maybe it’s just me).
On a daily basis, I come out here to throw out the day’s rubbish into the bins. This is a pretty busy area now that I think about it, and I don’t know how it didn’t get to the top of my priorities list.
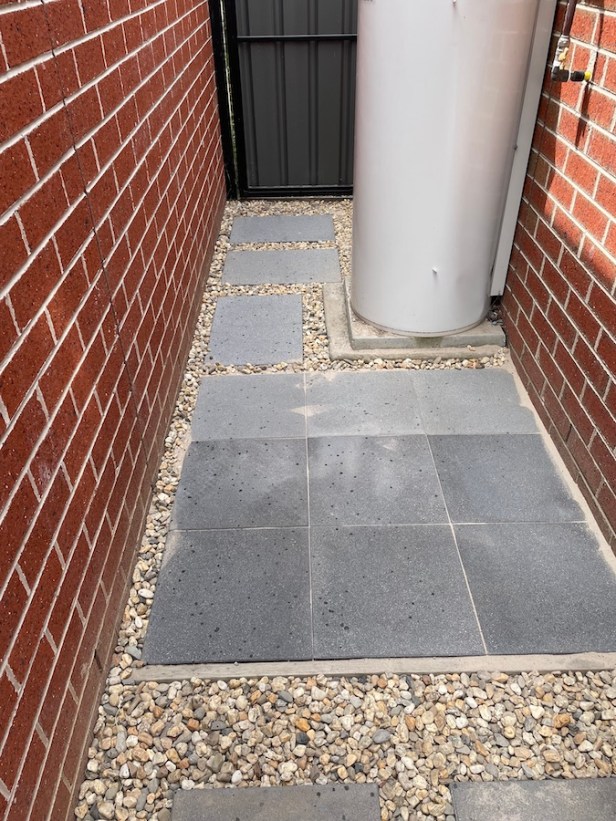
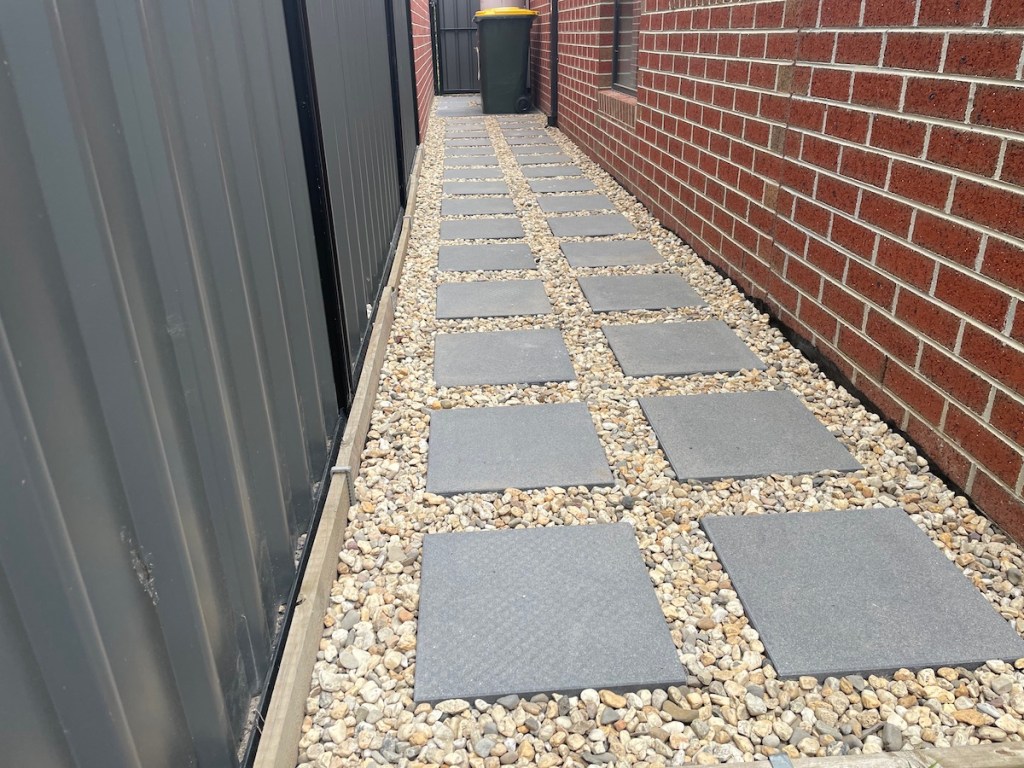
Anyway, here’s what it looked like (the best it has ever looked in 4 years):
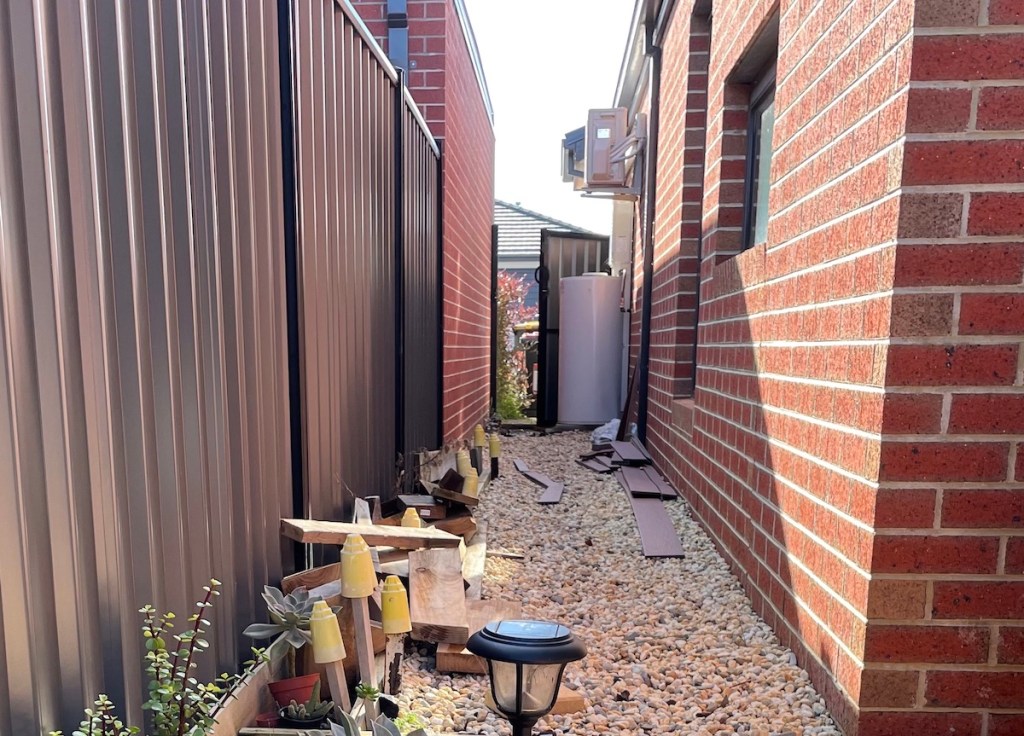
Those pebbles are from my backyard. I had to haul them over to make some space for our decking. It made things look better but I get kind of bogged down every time walk on it. And as you see, it doesn’t look like a proper pathway.
Next to the tank is where our two rubbish bins are (should be). Dragging the bins out on loose pebbles is a bit of a pain as well.
Goals
There are three things I want to achieve here:
- A stable pathway to walk on
- An easier access for the rubbish bins
- Aesthetics – of course we want to make it look better (with the current state, we can’t go wrong here)
Sections
By far, this is probably my biggest DIY project so let’s split this monster into two sections.
The two sections will be done in two different ways:
Pathway – for the pathway we will be using mortar to level our pavers and hold them in place
Rubbish bin area/platform – similar to how patios are made, where the pavers are laid tightly next to each other, I think it’s more practical and easier to use paving sand.
Section 1 – Pathway (mortar method)
This section covers the first part of this project which will focus on the pathway. We will be using mortar because the pavers will have some significant gaps in between and we need the mortar to hold them in place (hopefully for years to come).
Step 1: Prepare the base. Tamp/pound the ground with a tamper. Best to have crushed rocks for a solid foundation. If the ground moves, the pavers move.
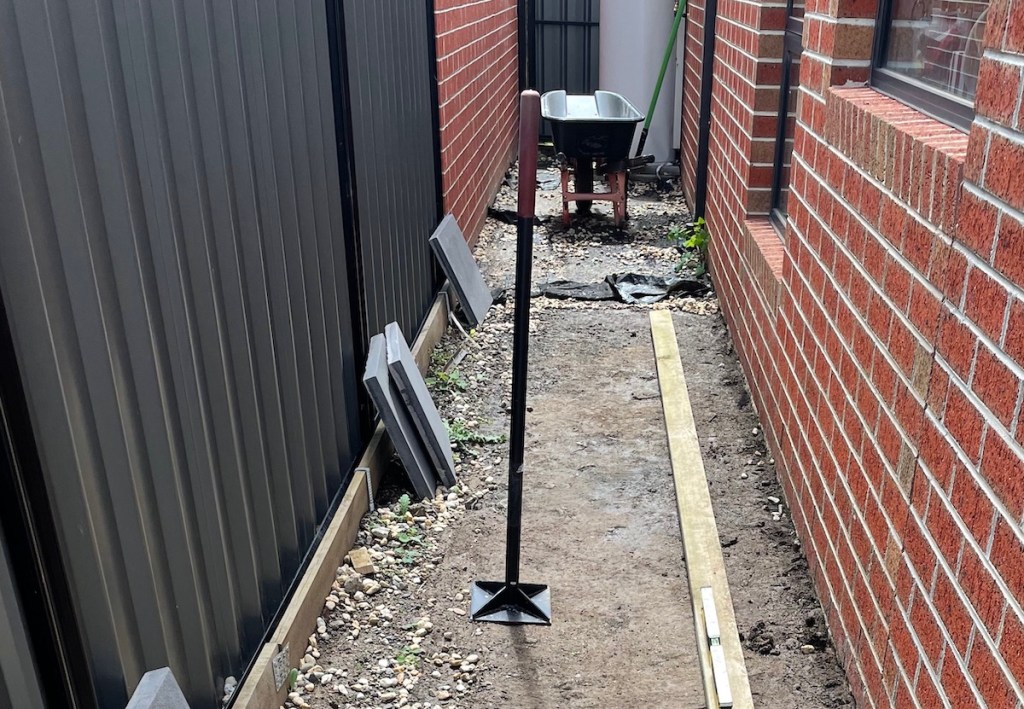
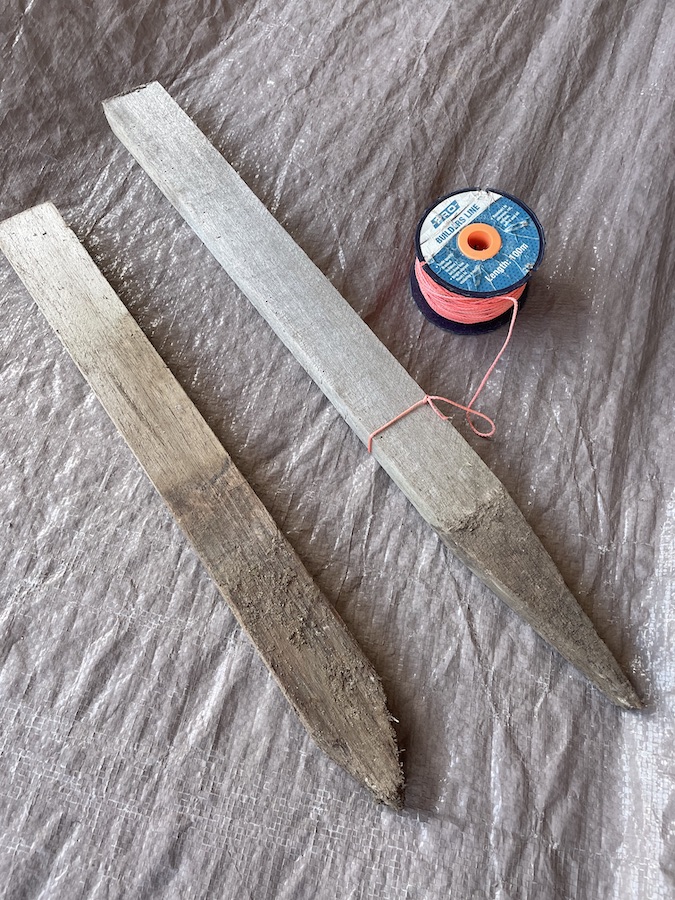
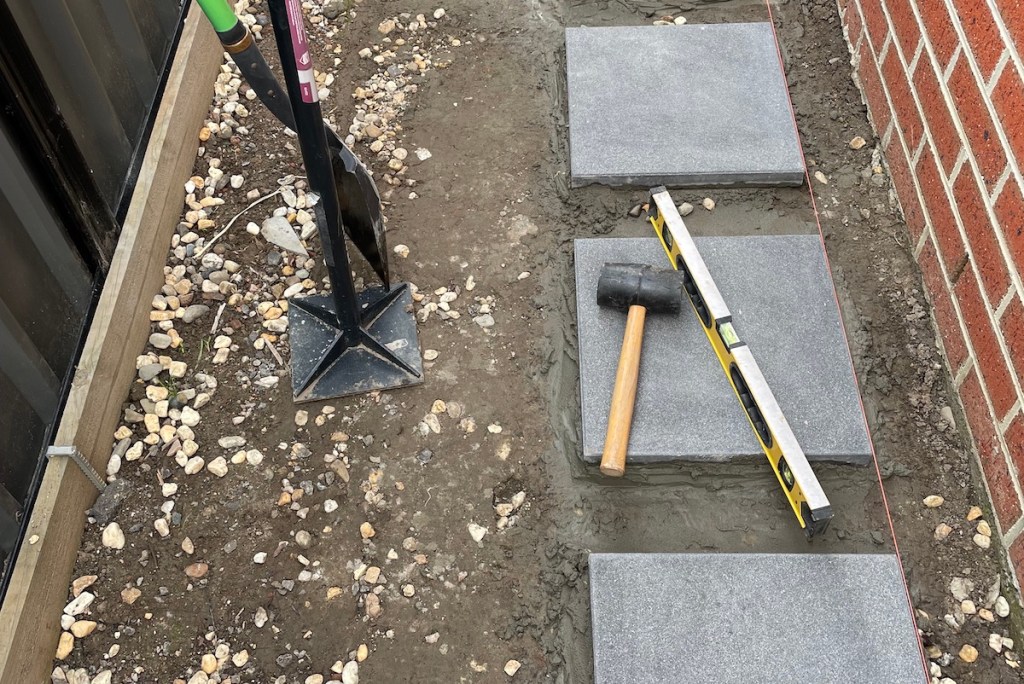
Step 2: Setup a line. Don’t trust your eyes, you’ll need a guide to keep things straight. You’ll need wooden stakes and a Builders Line (not sure if this is an official industry name) for this one,
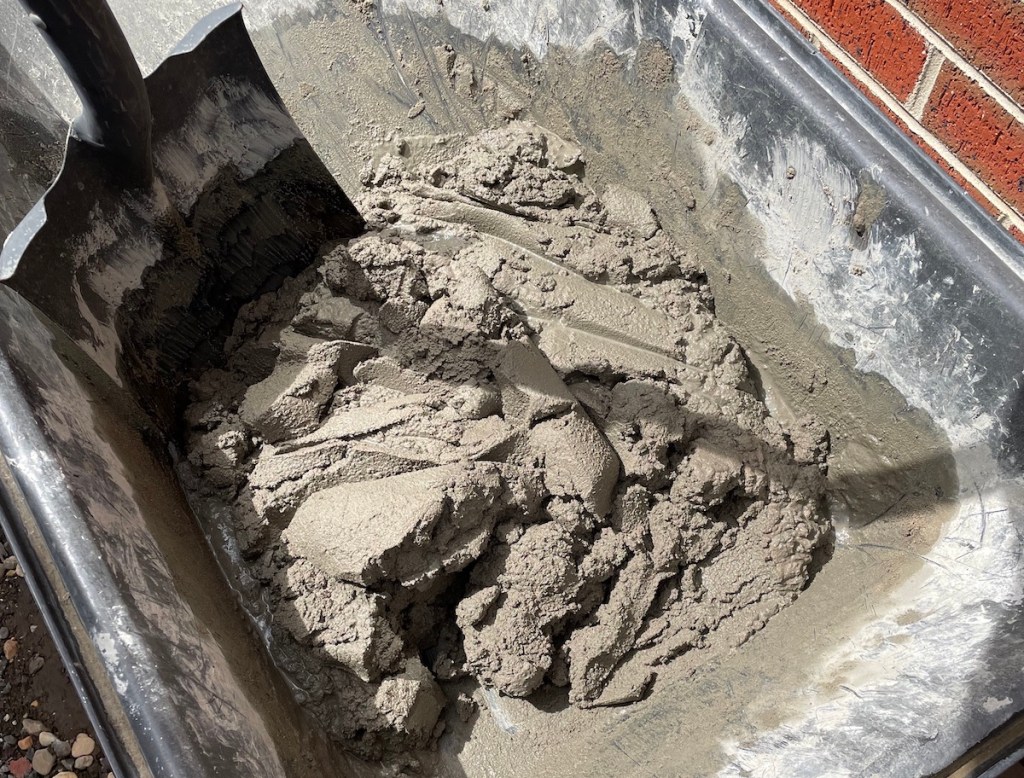
Step 3: Prepare the mortar.
I can’t give you the water to mortar ratio because I’m not really sure.
Just keep in mind that, there’s a sweet spot you’ll have to look for: a little too much water and the mortar will be too runny to hold up the pavers. A little too dry and it will be too hard to make level and height adjustments with a rubber mallet,
Step 4: Pour in some mortar and lay the pavers on. Use a spirit level in 2 directions to make sure you get a good level. Use a rubber mallet to make small level and height adjustments. Repeat.
Step 5: Lay the weed mat on. Weed mats aren’t perfect, but I’d say they block 99.9% of pesky weeds. Yes, studies have shown. 😀
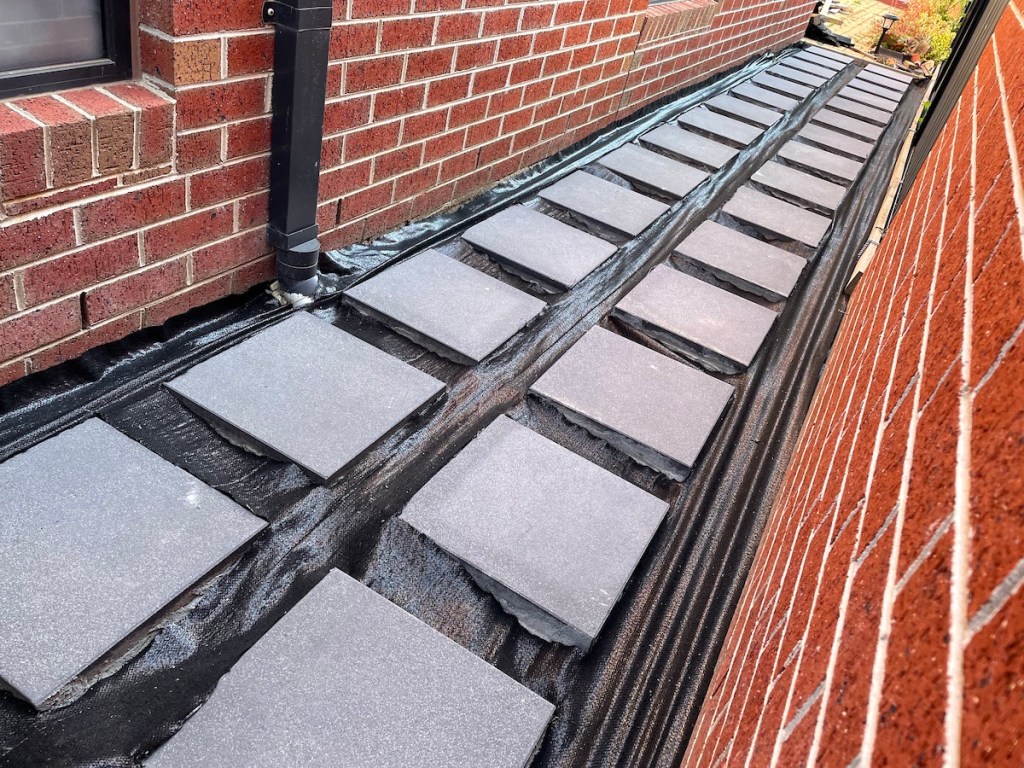
Step 6: Pebbles in. These are the pebbles that I had moved out of the way. This is probably the easiest part, the light at the end of the tunnel (for now).

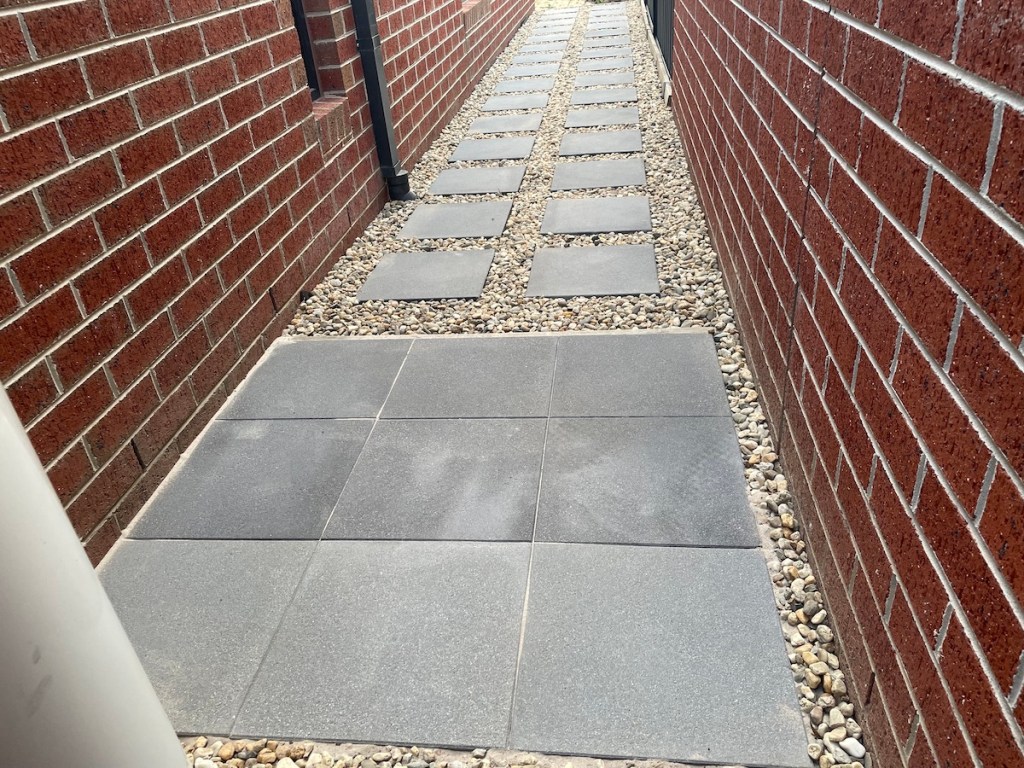
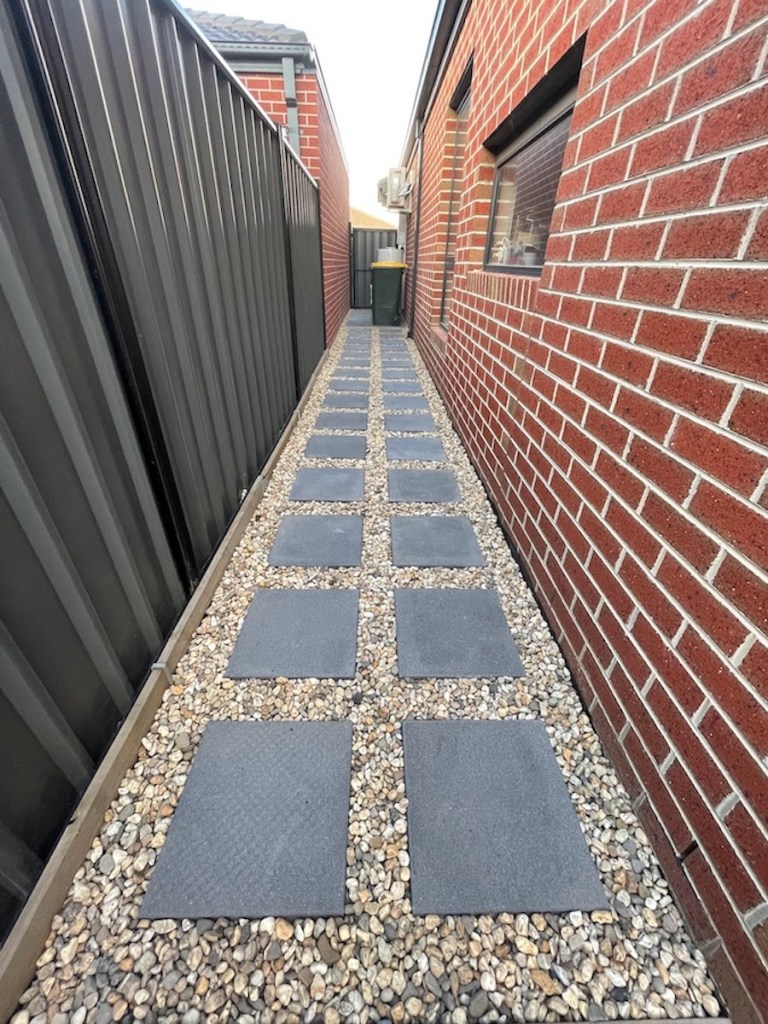
And that’s the end of the first section. If you want to build a pathway similar to that, you can already use that as a rough guide. Easy.
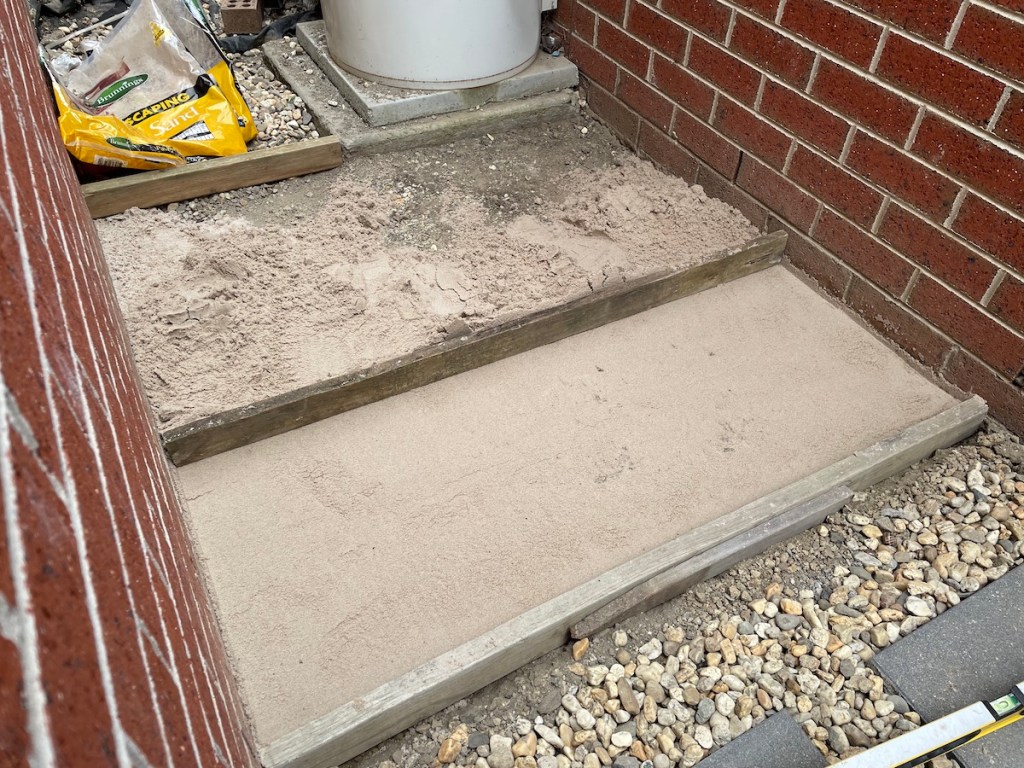
Section 2 – Rubbish Bin Platform (paving sand method)
My trash bins need a home and they won’t settle for less. We’ll try to build them a decent “parking lot” using sand as our base this time. I have done this before with smaller pavers (here’s the blog), but let’s do it again with much bigger and heavier pavers this time.
Step 1: Prepare the base. Sand will need something to hold it in place so let’s start with putting some timber on the boundaries. This can be temporary, we can remove the timber afterwards and seal it with mortar.
And of course, don’t forget the tamper. We need a solid base, always.

Step 2: Pour and screed. Pour some sand on one side and using a straight timbre or plank, screed evenly. In my previous blog, I made DIY screeder to make sure it’s levelled but this area is a bit small so I played it by ear (or eyes rather).
Also, there is a screeder online if you need one. Not sure if there is one in Bunnings.
Step 3: Lay the pavers. Not as easy as it looks. These bad boys probably weigh more than 15kg each – making tiny adjustments is a challenge.
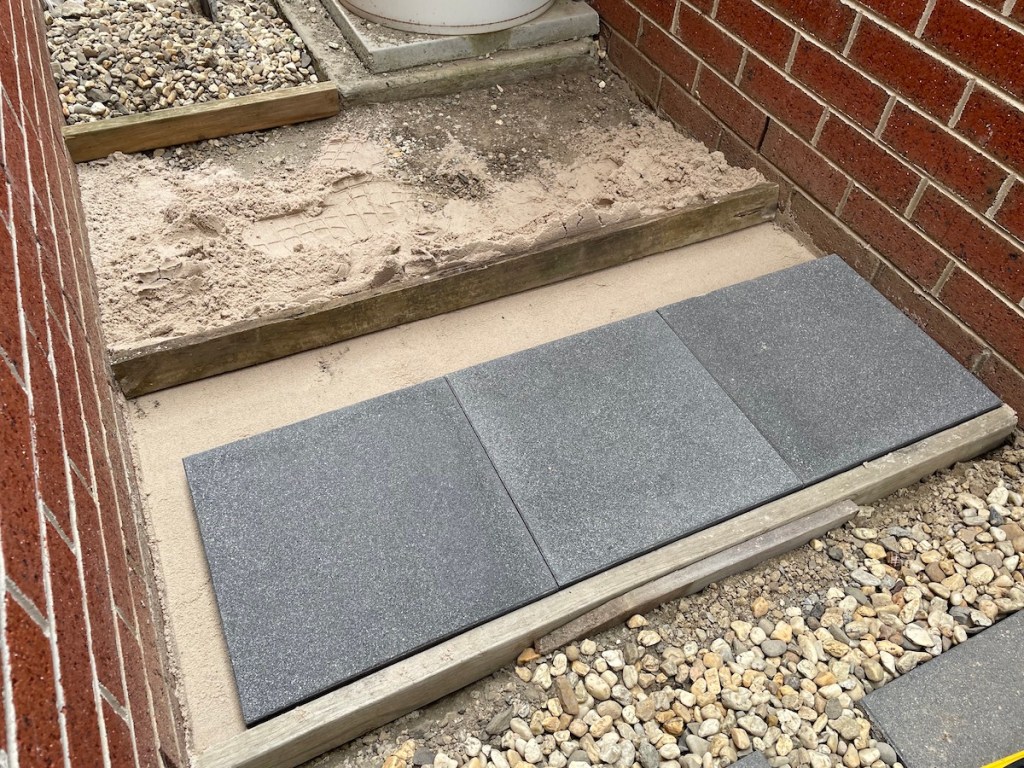
Repeat Steps 1 and 2 until done. Add sand as needed, screed, lay pavers, repeat.
Step 4: Fill in the gaps. Throw in some sand and sweep through the gaps. I normally wait for the sand to dry as wet/moist sand will not go down the gaps that easily. Keep sweeping until the gaps are all filled – you’ll know when to stop.

If you scale that up, you got yourself a patio. It’s really simple and I think it looks good, too. If I had the space I’d definitely make another one for a patio.
That’s the end of Section 2. Easy.
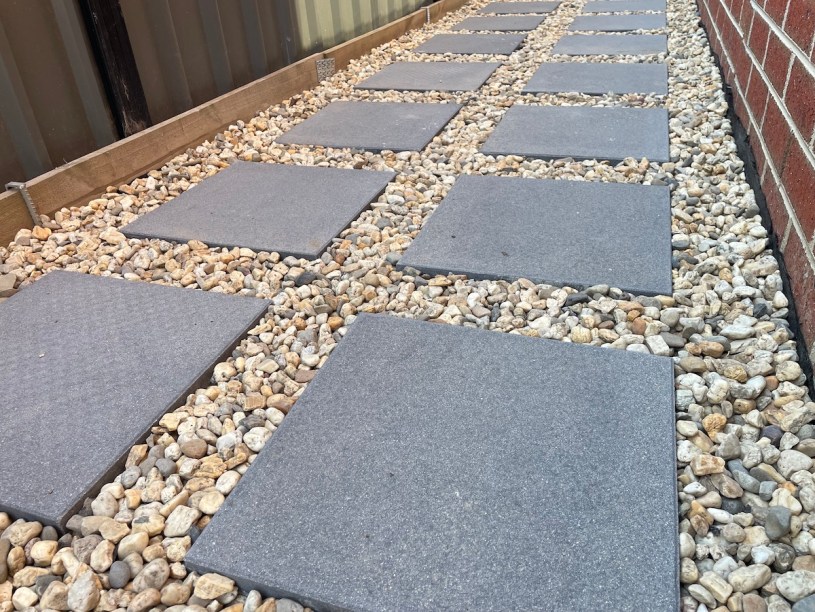
Photos
Any decent blogger would wash this off with a pressure washer before taking photos. I’ll let nature take its course, the rain will do its job. 😀


Key Takeaways
Before I end this, I’ll leave you with a few insights from this experience.
Size Matters
I’ve tried pavers of different sizes and with the 100 x 200 pavers for example, it took 550 something pieces compared to just 42 of these 400 x 400 which covered a relatively larger area. In hindsight, the smaller pavers were actually much easier to manage. Any average Joe like me can carry these 400×400 pavers with ease, but moving them around to get them into the right height, level and whatnot is another story – you will be put into weird and uncomfortable positions. Just remember not to rush, and you’ll be fine.
Mortar vs. Paving Sand
Each has its own pros and cons and I hope that this blog has given enough info to help one decide on which base to go with, depending on the project. Personally, I think the paving sand is much easier to work with and if I am to do this again, I may go with sand all the way.
Conclusion
It is once again a gruelling feat, at least for me. Well, almost all landscaping DIYs are physically demanding and that’s probably what makes it rewarding in the end.
If I get asked now, will I do this again? Maybe not. I feel like I need a holiday, or just lots of beer, pizza and Netflix. But just like having a hangover, we swear to all the gods that we won’t even go near a bottle shop. We all know it doesn’t take long ’til we’re at it again – this is no different. 😉
See you in the next one!

Thanks Fella, Good documentation/Photos… and great insights, Liking your posts!
LikeLiked by 1 person
Appreciate it!
LikeLike
Thank you! I was confused about which type of sand to use between pavers, but this article cleared it up. Definitely trying polymeric sand next time!
LikeLiked by 1 person